
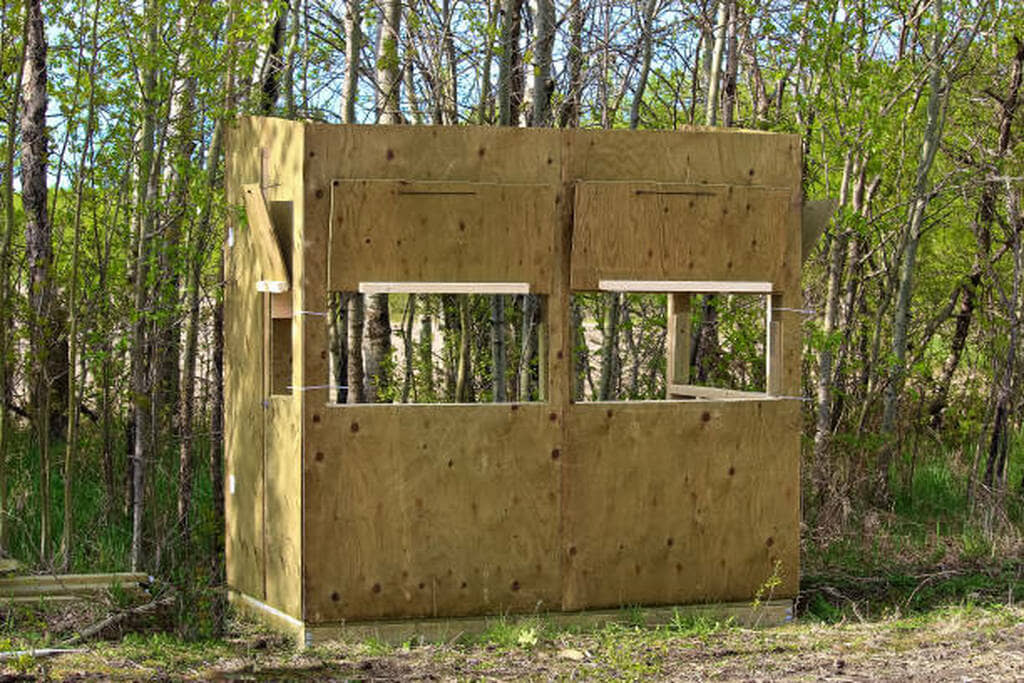
A quiet deer blind window can make the difference between getting a clean shot and watching a deer disappear before you even raise your bow or rifle. The best deer blind windows provide a clear field of view, open with minimal noise, seal tightly against wind and rain, and withstand years of outdoor exposure. Building them yourself also allows you to customize the size, opening style, and materials to match your hunting method and blind design.
Many DIY hunters focus on building a sturdy blind but overlook the window system. A poorly designed window may rattle in the wind, reflect sunlight, leak during rain, or squeak when opened. Any of these problems can alert deer, whose hearing and ability to detect unnatural movement are far more sensitive than many hunters realize. Choosing the right transparent panel, hardware, seals, and frame construction eliminates these issues while improving comfort during long hours in the blind.
This guide explains how to make deer blind windows that open quietly from start to finish. You’ll learn which materials work best, how to choose the right window dimensions, how to build a durable frame, install the window without damaging the panel, reduce noise with the proper hardware, weatherproof the finished window, and test everything before hunting season. By the end, you’ll have a reliable DIY window system that performs like a commercial product at a fraction of the cost.
What materials do you need to make deer blind windows?
The best deer blind windows combine a durable transparent panel, a rigid frame, quiet hardware, and weatherproof seals. Each component affects visibility, durability, noise, and long-term performance, so choosing quality materials is just as important as proper installation.
For the window panel, polycarbonate is the most durable option because it resists impact and is difficult to crack if struck by branches or accidental impacts. Acrylic, commonly sold as Plexiglass, offers excellent optical clarity and costs less than polycarbonate, but it is more likely to crack if drilled incorrectly or exposed to heavy impacts. Standard glass provides the clearest view but adds significant weight and can shatter, making it unsuitable for most DIY deer blinds.
A sturdy frame keeps the window square and prevents gaps that allow wind or moisture inside. Pressure-treated lumber is suitable for permanent blinds, while aluminum provides better resistance to moisture and requires less maintenance over time. Whatever material you choose, the frame should remain rigid enough to prevent twisting as temperatures and humidity change throughout the hunting season.
The hardware determines how quietly the window operates. Piano hinges distribute weight evenly across the entire window, reducing stress and minimizing squeaks. Quality butt hinges also perform well when properly lubricated. Magnetic catches keep the window firmly closed without creating the metallic noise common with standard latches, while rubber bumpers and foam weather stripping absorb vibration and eliminate rattling when strong winds shake the blind.
Use exterior-grade screws, waterproof wood glue, silicone sealant, and high-density weather stripping to protect the finished window from rain, drafts, dust, and insects. Stainless steel or galvanized fasteners are recommended because they resist corrosion after years of outdoor exposure. Although these materials cost slightly more initially, they significantly extend the service life of the window and reduce future maintenance.
Recommended materials
| Component | Recommended option | Reason |
|---|---|---|
| Window panel | Polycarbonate (Lexan) | Highest impact resistance |
| Budget panel | Acrylic (Plexiglass) | Clear and affordable |
| Frame | Pressure-treated lumber or aluminum | Strong and weather resistant |
| Hinges | Piano hinge | Quiet and evenly supports weight |
| Latch | Magnetic catch | Silent operation |
| Seal | Foam weather stripping | Blocks drafts and reduces noise |
| Sealant | Exterior silicone caulk | Waterproof protection |
| Fasteners | Stainless steel screws | Corrosion resistant |
What size should deer blind windows be?
The ideal deer blind window is large enough to provide a wide shooting angle without weakening the blind or exposing excessive movement inside. Window size should match the hunting style, shooting position, and overall dimensions of the blind.
For rifle hunting, many hunters build windows between 12 and 18 inches high and 24 to 36 inches wide. These dimensions provide sufficient visibility while maintaining enough wall structure for strength. Rifle hunters typically require less vertical clearance because the firearm is supported on a shooting rest.
Bow hunting usually requires larger openings because drawing a bow involves greater arm movement and wider shooting angles. Windows measuring 18 to 24 inches high and 30 to 40 inches wide generally provide enough clearance without forcing the hunter into awkward shooting positions. Larger openings also improve visibility when tracking deer moving through multiple shooting lanes.
Window height is equally important. The bottom edge should align comfortably with the seated shooting position so the hunter can aim naturally without raising or lowering their shoulders excessively. Before cutting the wall, sit on the chair or swivel seat that will be used during hunting and simulate several shooting positions. Mark the comfortable eye level and shooting height before determining the final window location.
Multiple medium-sized windows often perform better than one oversized opening. Separate windows provide wider visibility around the blind while maintaining structural strength and reducing the amount of exposed movement. They also allow hunters to open only the window facing approaching deer, helping retain warmth and minimize unnecessary noise during cold-weather hunts.
How do you build a deer blind window frame?
A square, rigid frame is the foundation of a quiet and weather-resistant deer blind window. Even high-quality hinges and window panels cannot operate smoothly if the frame twists, sags, or goes out of alignment.
Begin by measuring the rough opening after the blind walls are fully assembled. Measure the width, height, and both diagonal corners. Equal diagonal measurements indicate the opening is square. If the opening is out of square, correct it before cutting any frame pieces. A poorly aligned opening can cause the window to bind, leave uneven gaps, and create unwanted noise every time it is opened or closed.
Build the frame from straight 2×2 or 2×3 lumber for most wooden blinds. These dimensions provide enough strength without adding unnecessary weight. If the blind is constructed with metal framing, use square aluminum tubing of a similar size to improve durability and reduce maintenance.
Cut each frame piece accurately and assemble the frame on a flat surface. Secure every corner with exterior-grade screws and waterproof wood glue instead of nails. Screws create stronger joints that are less likely to loosen after repeated opening and closing. Before tightening all fasteners, verify the frame remains square by measuring both diagonals again.
Leave a clearance gap of approximately 1/8 to 1/4 inch (3–6 mm) between the frame and the window panel. This expansion gap allows acrylic and polycarbonate panels to expand and contract as temperatures change. Without sufficient clearance, the panel may warp, bind, or crack during hot summer days or freezing winter conditions.
Before installing hardware, lightly sand all edges and remove sharp corners. Smooth surfaces allow weather stripping to seal evenly and reduce friction where moving parts contact the frame. Applying an exterior paint or wood preservative before final assembly also protects the frame from moisture and extends its service life.
How do you install the window panel?
Proper installation prevents cracks, air leaks, rattling, and premature wear. The window panel should sit securely inside the frame while still having enough room to expand naturally with temperature changes.
Place the acrylic or polycarbonate sheet into the completed frame and confirm that equal clearance remains on every side. Never force the panel into a tight opening. If resistance is excessive, trim the opening slightly instead of applying pressure to the panel.
When drilling mounting holes, use a drill bit specifically designed for plastics or a standard bit sharpened for acrylic. Drill at a slow speed while supporting the sheet on a flat surface to minimize vibration. Each hole should be slightly larger than the screw diameter to allow for thermal expansion. Tight-fitting screws can place continuous stress on the panel and eventually cause cracking around the fasteners.
Avoid overtightening screws during installation. Tighten each fastener only until the washer contacts the panel firmly without compressing the plastic. Rubber or neoprene washers distribute pressure evenly and reduce the risk of stress fractures while also helping absorb vibration when the window is closed.
Apply a continuous bead of exterior-grade silicone sealant around the frame where water could enter, but do not seal the panel so tightly that it cannot expand. Weather stripping should compress slightly when the window closes, creating an airtight seal without requiring excessive force to latch the window.
Once installation is complete, open and close the window at least 20 to 30 times before installing the remaining hardware. The movement should feel smooth, with no scraping, binding, or excessive resistance. If the panel rubs against the frame at any point, correct the alignment immediately. Small adjustments at this stage prevent larger problems after the blind has been exposed to changing weather conditions.
How do you make deer blind windows open quietly?
A quiet deer blind window depends on eliminating friction, vibration, and loose contact points. Most unwanted noise comes from metal components rubbing together, panels shifting inside the frame, or hardware that loosens after repeated use.
Choose hinges designed for smooth movement before considering additional noise-reduction products. A full-length piano hinge is one of the best options because it supports the entire window evenly, reducing flex and preventing the squeaks that often develop with two or three individual hinges. If you prefer standard butt hinges, select heavy-duty models with corrosion-resistant pins and apply a dry silicone lubricant before the hunting season. Avoid grease-based lubricants because they attract dust and debris that eventually increase friction.
Install weather stripping wherever the window contacts the frame. Closed-cell foam weather stripping compresses when the window closes, creating a cushioned seal that prevents wood, metal, or plastic surfaces from striking each other. This simple addition not only reduces noise but also improves insulation and blocks small air leaks that can make long sits uncomfortable during cold weather.
Replace traditional hook-and-eye latches with magnetic catches or compression latches whenever possible. Magnetic catches hold the window securely without producing the sharp metallic click associated with many mechanical latches. Compression latches provide an even tighter seal by pulling the window firmly against the weather stripping, minimizing movement during windy conditions.
Inspect every moving component after installation. Tighten loose screws, replace worn rubber bumpers, and confirm the window cannot move when fully closed. Even a slight amount of movement can create repeated rattling as wind vibrates the blind throughout the day. Testing the window on a windy afternoon is one of the easiest ways to identify small noises that may go unnoticed inside a garage or workshop.
If the window still produces noise, identify the exact source before making adjustments. A strip of masking tape placed temporarily over suspected contact points can help isolate the problem. Once the noise disappears, replace that temporary solution with permanent foam padding, a rubber washer, or a properly adjusted latch.
How do you waterproof and insulate deer blind windows?
Proper weatherproofing keeps the blind dry, reduces heat loss, and extends the life of every window component. Moisture that enters around the frame can damage wood, corrode hardware, and eventually prevent the window from operating smoothly.
Seal all exterior joints with a high-quality silicone or polyurethane sealant designed for outdoor construction. Apply a continuous bead where the frame meets the wall and smooth the sealant to eliminate gaps where rainwater could penetrate. Allow the sealant to cure completely before exposing the blind to heavy rain.
Install closed-cell foam weather stripping around the entire window perimeter. Unlike open-cell foam, closed-cell material absorbs very little water and maintains its shape after repeated compression. A continuous seal prevents drafts while reducing dust, insects, and wind-driven rain from entering the blind.
Condensation is another common issue, especially during late-season hunts when warm breath meets a cold window surface. Small ventilation openings near the roof allow humid air to escape without creating significant drafts. Position these vents away from the shooting windows so airflow does not interfere with scent control or create unnecessary movement.
Wooden frames should receive at least two coats of exterior paint, stain, or clear waterproof sealer before installation. Protecting every surface—including the edges and cut ends—reduces moisture absorption and helps prevent swelling, shrinking, and warping throughout the year. Metal components should also be inspected regularly for chipped coatings or early signs of corrosion.
At the beginning of every hunting season, inspect the sealant, weather stripping, and hardware. Replace cracked caulk, compressed foam seals, or loose fasteners before they allow water to enter the blind. Performing this maintenance once a year is significantly easier than repairing water damage after multiple seasons of exposure.
How do you test deer blind windows before hunting?
Testing the windows before opening day ensures they operate quietly, seal properly, and provide a clear shooting lane. Identifying small issues at home is much easier than fixing them while deer season is underway.
Start by opening and closing each window at least 20 to 30 times. The movement should feel smooth from start to finish without sticking, squeaking, or requiring excessive force. If the window catches on one side, inspect the hinges and frame alignment before making adjustments. A properly aligned window should stay in position when partially open and close without slamming.
Next, check for rattles by gently shaking the frame and window while they are closed. If you hear movement, inspect the latch, hinge screws, weather stripping, and rubber bumpers. Tightening loose hardware or adding additional foam padding usually eliminates unwanted vibration before it becomes noticeable in windy conditions.
Verify the shooting position from every window inside the blind. Sit in the chair or swivel seat you plan to use during the hunt and confirm you can comfortably cover each shooting lane without stretching or leaning excessively. The window should provide a clear view while keeping most of your body concealed behind the blind wall.
Test the window under realistic weather conditions whenever possible. Open and close it on a cold morning, during light rain, or on a windy day to identify problems that may not appear inside a workshop. Temperature changes can affect plastic expansion, while wind may reveal small rattles or air leaks that require additional sealing.
Finally, inspect visibility through the window at sunrise and sunset. These low-light periods are when deer are most active, and glare or condensation can significantly reduce your ability to spot movement. If reflections become distracting, consider adding a removable sun visor above the window or applying a non-reflective film that preserves visibility without noticeably reducing light transmission.
What are the most common mistakes when making deer blind windows?
Most DIY deer blind window problems result from poor planning rather than poor craftsmanship. Avoiding a few common mistakes improves durability, weather resistance, and quiet operation.
One of the most frequent mistakes is selecting the wrong window material. Thin acrylic sheets may flex excessively or crack around mounting holes, while ordinary glass adds unnecessary weight and creates a safety hazard if broken. Choosing a panel designed for outdoor use provides better long-term performance.
Another common mistake is installing the panel too tightly inside the frame. Acrylic and polycarbonate expand and contract as temperatures change. Without enough clearance, the panel can bind against the frame, develop stress cracks, or become difficult to open during hot weather.
Many builders also underestimate the importance of weather stripping. Leaving small gaps around the frame allows wind, rain, insects, and dust to enter the blind. These gaps also create vibration that produces rattling noises capable of alerting nearby deer.
Poor hardware selection creates another source of problems. Lightweight hinges may sag after repeated use, while inexpensive latches often loosen over time. Investing in heavy-duty hinges, magnetic catches, and corrosion-resistant fasteners reduces maintenance and improves reliability throughout multiple hunting seasons.
Finally, many hunters skip testing before opening day. Discovering a squeaky hinge, loose latch, or leaking seal during the first hunt can reduce confidence and waste valuable hunting opportunities. A complete inspection before the season begins helps ensure every component performs as expected.
Read more: The 5 Best Deer Blind Heater Reviews: Stay Warm While Hunting!
Are homemade deer blind windows better than commercial windows?
Homemade deer blind windows can perform as well as commercial products when they are built with quality materials and careful attention to detail. The better choice depends on your budget, available tools, and desired level of customization.
DIY windows offer complete flexibility. You can choose the exact dimensions, opening direction, frame material, and hardware that match your blind and hunting style. This flexibility is especially valuable for custom-built blinds where standard commercial window sizes may not fit correctly. Building your own windows can also reduce costs if you already own basic woodworking tools.
Commercial deer blind windows save time and often include factory-installed hinges, seals, and tempered or molded panels. Many premium models are designed specifically to minimize noise and resist weather exposure. Installation usually requires only cutting the wall opening and fastening the completed unit into place.
Durability depends more on construction quality than whether the window is homemade or factory-built. A carefully built DIY window using polycarbonate, stainless steel hardware, quality weather stripping, and proper sealing can remain reliable for many hunting seasons. In contrast, a poorly assembled window—regardless of its origin—may develop leaks, rattles, or alignment issues after only a short period of use.
For most hunters building a permanent wooden blind, a DIY window provides the best balance of cost, customization, and long-term performance. Hunters who need a faster installation or prefer a maintenance-free solution may find commercial window kits more convenient despite their higher purchase price.
How do you maintain deer blind windows?
Regular maintenance keeps deer blind windows quiet, weatherproof, and reliable throughout multiple hunting seasons. Most maintenance tasks require only a few minutes but can prevent expensive repairs later.
Inspect every window before the hunting season begins. Check hinges, screws, latches, and weather stripping for signs of wear or looseness. Tighten any hardware that has shifted over time and replace damaged seals before they allow water or air to enter the blind.
Clean the window panels with a microfiber cloth and a cleaner formulated for acrylic or polycarbonate. Avoid ammonia-based glass cleaners because they can cause certain plastic panels to become cloudy or develop fine surface cracks after repeated use. Removing dirt, pollen, and fingerprints also improves visibility during the low-light conditions when deer are most active.
Lubricate hinges and moving hardware once or twice a year using a dry silicone spray. Unlike grease or oil, silicone lubricants do not attract dust, leaves, or other debris that can increase friction and create noise. Wipe away excess lubricant after application to keep the window operating smoothly.
Inspect the exterior sealant annually for cracks or gaps caused by UV exposure and changing temperatures. Remove damaged caulk before applying a fresh bead to maintain a watertight seal. Wooden frames should also be repainted or resealed whenever the protective finish begins to fade or peel.
If the blind remains outdoors year-round, remove heavy snow from the roof and keep branches from rubbing against the windows during windy weather. Reducing unnecessary stress on the frame and panel helps preserve alignment and extends the lifespan of the entire window assembly.
Frequently asked questions about deer blind windows
Can plexiglass crack in freezing weather?
Yes. Acrylic (Plexiglass) becomes more brittle in extremely cold temperatures and may crack if it is struck or installed under excessive stress. Polycarbonate is a better choice for hunters who regularly experience freezing winters because it maintains much higher impact resistance.
Should deer blind windows stay open while hunting?
Keep windows closed until you need to shoot whenever possible. A closed window helps contain movement, reduce outside noise, limit wind entering the blind, and improve scent control. Open only the window covering the active shooting lane when preparing for a shot.
Can you tint deer blind windows?
Yes. Lightly tinted films can reduce glare and help conceal movement inside the blind. However, excessively dark tint may reduce visibility during dawn and dusk, when deer movement is typically highest.
How thick should plexiglass be?
For most DIY deer blinds, 1/4-inch (6 mm) acrylic or polycarbonate provides a good balance between strength, visibility, and weight. Larger windows or areas exposed to high winds may benefit from thicker panels for additional rigidity.
Do sliding windows work better than hinged windows?
Neither design is universally better. Sliding windows require less clearance and remain protected from wind when opened, making them ideal for narrow blinds. Hinged windows are simpler to build, seal more effectively against weather, and are easier to maintain with basic tools. The best option depends on your blind layout, available space, and personal preference.