Field dressing a deer is the process of removing the internal organs immediately after harvesting the animal to preserve meat quality, reduce bacterial growth, and make transportation easier. Performing this step as soon as possible allows body heat to escape, slows spoilage, and minimizes the risk of contamination from the digestive tract. Whether you are hunting whitetail deer, mule deer, or another deer species, proper field dressing is one of the most important skills every hunter should master.
This guide explains how to field dress a deer step by step, beginning with the tools you need and ending with proper carcass cooling. Instead of simply listing the steps, it also explains why each action matters, how to avoid common mistakes, and what to inspect before keeping the venison. Understanding the purpose behind every step helps you work more efficiently and protect the quality of the meat.
You’ll also learn practical food safety practices, including how to prevent puncturing the stomach or intestines, when to wear disposable gloves, how to recognize signs of an unhealthy deer, and what additional precautions to take in areas where Chronic Wasting Disease (CWD) has been detected. By following these recommendations, you can produce cleaner venison, reduce waste, and prepare the carcass for skinning, transport, and final processing with confidence.
Table of Contents
- What Does Field Dressing A Deer Mean?
- What Tools Do You Need to Field Dress a Deer?
- How To Field Dress A Deer Step by Step?
- Step 1. Position the deer on its back
- Step 2. Make the first incision
- Step 3. Open the abdominal cavity
- Step 4. Cut the diaphragm
- Step 5. Free the esophagus and trachea
- Step 6. Remove the internal organs
- Step 7. Drain blood and body fluids
- Step 8. Inspect the body cavity
- Step 9. Cool the carcass immediately
- How Do You Avoid Contaminating Deer Meat?
- What Should You Inspect Before Keeping the Venison?
- What Should You Do After Field Dressing a Deer?
- What Are the Most Common Field Dressing Mistakes?
- How long can a deer stay before field dressing?
- Can you field dress a deer without hanging it?
- Frequently Asked Questions
- Final Thoughts
What Does Field Dressing A Deer Mean?
Field dressing a deer is the process of removing the animal’s internal organs immediately after the harvest while leaving the hide attached. Hunters perform this procedure in the field to cool the carcass quickly, reduce bacterial growth, and preserve venison quality before transporting the deer for skinning and processing.
Removing the organs is necessary because the digestive system and body cavity retain heat long after the animal dies. If that heat remains trapped, bacteria multiply rapidly, especially when daytime temperatures exceed 40°F (4°C). By opening the body cavity and removing the organs, heat escapes much faster, slowing spoilage and helping the meat retain its natural color, texture, and flavor.
Field dressing also makes the carcass significantly lighter. A deer’s internal organs account for a substantial portion of its weight, so removing them makes dragging, loading, or carrying the animal much easier, particularly in remote hunting areas. It also allows hunters to inspect the heart, liver, lungs, and other organs for abnormalities that could indicate disease or contamination before deciding whether the meat is safe to keep.
Although many beginners confuse field dressing with skinning or quartering, they are separate steps performed at different stages.
- Field dressing removes the internal organs immediately after harvest.
- Skinning removes the hide to prepare the carcass for processing.
- Quartering divides the carcass into manageable sections for transport or butchering.
Completing these tasks in the correct order helps maintain meat quality while making every subsequent processing step safer and more efficient.
What Tools Do You Need to Field Dress a Deer?
Using the right equipment makes field dressing faster, safer, and less likely to contaminate the meat. Most experienced hunters carry a compact field dressing kit that includes only a few essential tools, allowing them to complete the entire process without unnecessary equipment.
A sharp hunting knife is the most important tool. A blade between 3 and 5 inches provides enough control for making precise cuts around the abdomen, diaphragm, and esophagus without accidentally puncturing the stomach or intestines. Many hunters also prefer a knife with a gut hook because it opens the abdominal cavity while reducing the risk of cutting internal organs.
Disposable nitrile or latex gloves protect both the hunter and the venison. Gloves reduce direct contact with blood and body fluids while lowering the chance of transferring bacteria onto the meat. In regions where Chronic Wasting Disease (CWD) has been detected, wearing gloves is strongly recommended whenever handling a harvested deer.
Several additional tools can make the job easier in the field:
- A small bone saw if local regulations or your preferred method requires cutting through the pelvis or sternum.
- A length of rope or paracord to position the deer on uneven ground.
- Paper towels or clean shop towels to wipe away blood and remove loose debris.
- Game bags to keep insects, leaves, and dirt away from exposed meat during transport.
- A headlamp for low-light conditions during early morning or evening hunts.
- Hand sanitizer or disinfectant wipes to clean your hands and knife before packing up.
Before beginning, inspect your knife to ensure it is razor sharp. A dull blade requires more force, increases fatigue, and is more likely to slip, leading to accidental injuries or unwanted cuts that can contaminate the venison. Spending a few minutes preparing your tools before making the first incision often saves much more time during the dressing process.
How To Field Dress A Deer Step by Step?
Field dressing a deer involves nine essential steps that remove the internal organs while keeping the venison clean and cooling the carcass as quickly as possible. Work carefully rather than quickly. A clean, controlled cut causes less damage to the meat than rushing through the process.
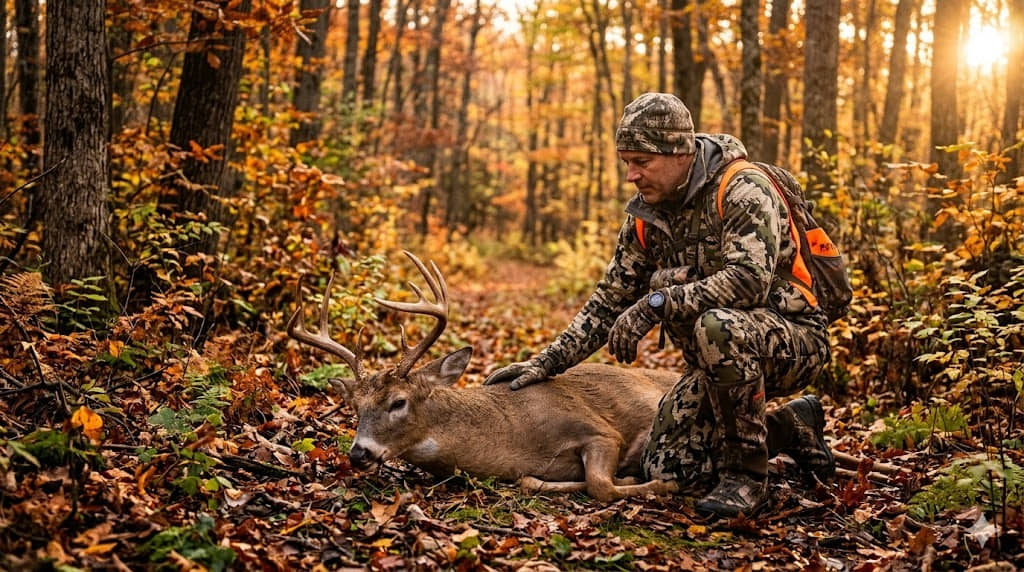
Step 1. Position the deer on its back
Lay the deer on its back with the head positioned slightly uphill if the terrain allows. Spread the hind legs to expose the abdomen and create enough working space. If you’re hunting alone, use rope or paracord to secure the legs to nearby trees or branches so the carcass remains stable while you work.
Before making any cuts, put on disposable gloves and confirm the animal has expired completely. Keep your knife clean and within easy reach throughout the process.
Step 2. Make the first incision
Begin with a shallow cut through the skin just below the breastbone and continue toward the pelvis. Lift the skin with your free hand before cutting so the knife blade stays above the organs rather than pressing into them.
Once the skin is opened, continue cutting through the abdominal wall using the tip of the blade or a gut hook. Apply only enough pressure to separate the muscle layer. The goal is to expose the body cavity without puncturing the stomach, intestines, or bladder.
Taking small, controlled cuts greatly reduces the chance of contaminating the meat with digestive contents.
Step 3. Open the abdominal cavity
Extend the incision until it reaches the pelvic area. As the cavity opens, use one hand to gently pull the abdominal wall upward while guiding the knife forward with the other hand. This creates additional space between the blade and the organs.
You may notice the stomach, intestines, liver, and other organs becoming visible. Leave them intact until the surrounding connective tissues have been released.
Step 4. Cut the diaphragm
The diaphragm is a thin sheet of muscle separating the chest cavity from the abdomen.
Slide the knife around the inside edge of the rib cage to free the diaphragm completely. Cutting this membrane opens access to the heart and lungs while allowing the organs to be removed as one connected group instead of individually.
Avoid cutting deeply into the chest muscles. Only the thin membrane needs to be separated.
Step 5. Free the esophagus and trachea
Reach as far forward into the chest cavity as possible and locate the esophagus and windpipe (trachea). Cut both structures near the throat before pulling them toward the abdominal cavity.
Many experienced hunters pinch or tie the esophagus before cutting it to reduce the chance of stomach contents leaking into the carcass. Although not always necessary, this technique helps keep the body cavity cleaner.
Step 6. Remove the internal organs
Grip the esophagus and begin pulling the organs toward the rear of the deer while cutting any remaining connective tissue. The lungs, heart, liver, stomach, and intestines should gradually separate from the body cavity.
Work slowly around the pelvis because the bladder and lower intestine are most vulnerable to accidental puncture. If the organs resist, stop pulling and locate the remaining tissue holding them in place instead of using excessive force.
A successful field dressing leaves the entire body cavity empty with minimal damage to the organs.
Step 7. Drain blood and body fluids
Turn the carcass onto one side or position the front slightly lower than the hindquarters to allow blood and remaining fluids to drain naturally.
Use clean paper towels or cloths to wipe away pooled blood, loose hair, leaves, and dirt. Avoid rinsing the cavity with untreated stream or pond water because natural water sources may introduce bacteria that accelerate spoilage.
Step 8. Inspect the body cavity
Once the cavity is empty, inspect both the meat and the remaining tissues.
Healthy venison typically appears deep red, while fat ranges from white to creamy yellow depending on the animal’s diet and season. Examine the liver, lungs, and lymph nodes for unusual swelling, discoloration, pus, foul odors, or large parasites. Any significant abnormality should be evaluated according to your local wildlife agency’s recommendations before consuming the meat.
This is also the ideal time to trim away any tissue that was accidentally contaminated during the dressing process.
Step 9. Cool the carcass immediately
Cooling the carcass is the final and one of the most important steps of field dressing. Heat trapped inside the muscles creates an ideal environment for bacterial growth, especially during warm weather.
Prop the body cavity open with clean sticks or commercial cavity spreaders to improve airflow. Hang the deer whenever possible so air can circulate around all sides of the carcass. If outside temperatures are warm, transport the deer to refrigeration or pack the cavity with bags of ice that keep meltwater away from the meat.
As a general guideline, the sooner the internal temperature drops, the better the venison will taste and the longer it can be safely aged before butchering.
How Do You Avoid Contaminating Deer Meat?
Preventing contamination depends on four practices: making controlled cuts, protecting the meat from dirt, minimizing bacterial exposure, and cooling the carcass quickly. Most venison spoilage occurs because digestive contents, hair, soil, or excessive heat come into contact with the meat during or immediately after field dressing.
The most common source of contamination is accidentally puncturing the stomach, intestines, or bladder. These organs contain bacteria and waste that can spread across the body cavity if cut open. To avoid this, lift the abdominal wall away from the organs before making each cut, use only the tip of the knife, and advance the blade with short, controlled strokes rather than long slicing motions. Hunters using a gut hook often reduce this risk because the blade stays above the organs while opening the abdomen.
If stomach contents or urine accidentally contact the meat, remove the contamination immediately instead of continuing the dressing process. Trim away any visibly affected tissue with a clean knife, then wipe the surrounding area thoroughly using clean paper towels or disposable cloths. Avoid attempting to “wash away” contamination with muddy creek or pond water, as untreated water may introduce additional bacteria. If clean potable water is available, use it sparingly and dry the cavity afterward to reduce moisture that encourages bacterial growth.
Keeping the carcass clean throughout the process is equally important. Place removed organs on the ground away from the exposed meat, and avoid dragging the open body cavity through mud, leaves, sand, or standing water. If the deer must remain in the field for a period before transport, cover the cavity with a breathable game bag to keep insects, dirt, and debris away while still allowing heat to escape.
Temperature has a greater impact on meat quality than many first-time hunters realize. Bacteria multiply rapidly as the carcass remains warm, making prompt cooling one of the most effective ways to preserve venison. Open the body cavity fully, allow air to circulate, and move the deer into shade whenever possible. During warm-weather hunts, transporting the carcass to refrigeration or packing it with bagged ice should become the next priority after field dressing is complete.
Finally, maintain good personal hygiene throughout the process. Wear disposable gloves, clean your knife whenever it becomes contaminated, and wash your hands before handling food, drinking water, or other hunting equipment. These simple precautions protect both the hunter and the quality of the venison.
Read more: Is a .223 Good for Deer Hunting? Pros and Cons Every Hunter Should Know
What Should You Inspect Before Keeping the Venison?
Inspecting the carcass before processing helps determine whether the venison appears healthy and safe to consume. While most harvested deer show no signs of disease, every hunter should perform a visual inspection before transporting or butchering the animal.
Begin by examining the body cavity after the organs have been removed. Healthy muscle tissue is typically firm and deep red without an unusual odor. The body cavity should be free of excessive discoloration, large blood clots unrelated to the shot, or abnormal fluid accumulation. Small amounts of blood are normal, but thick green, yellow, or foul-smelling discharge may indicate infection.
Next, inspect the major organs, especially the liver, lungs, heart, and kidneys. A healthy liver has a smooth surface and a consistent dark reddish-brown color. The lungs should appear evenly colored without large abscesses or extensive white nodules. The heart should not contain unusual growths, while the kidneys should remain firm and intact. If multiple organs show swelling, pus-filled pockets, extensive parasites, or unexplained lesions, the deer should not be processed until guidance is obtained from your local wildlife agency.
Hunters should also pay attention to the animal’s condition before the shot. A deer that appears severely emaciated, behaves abnormally, shows excessive drooling, struggles to walk, or displays obvious neurological symptoms may be affected by disease. Harvested animals showing these signs deserve additional caution, even if the meat appears normal.
Special precautions are necessary in regions where Chronic Wasting Disease (CWD) has been detected. CWD is a fatal neurological disease affecting members of the deer family, including whitetail deer, mule deer, elk, and moose. Although there is currently no confirmed case of CWD spreading to humans, wildlife agencies recommend minimizing exposure to high-risk tissues such as the brain, spinal cord, eyes, spleen, and lymph nodes. Hunters should wear gloves while field dressing, avoid cutting through the spinal column unless necessary, and follow local regulations regarding carcass transport and mandatory testing.
If CWD testing is recommended or required in your hunting area, keep the carcass properly chilled until samples can be submitted. Waiting for test results before consuming the venison provides an additional level of precaution and ensures compliance with state or provincial wildlife regulations.
Completing this inspection takes only a few minutes, but it helps identify potential health concerns before significant time and effort are invested in processing the meat.
What Should You Do After Field Dressing a Deer?
After field dressing, the priority is to cool the carcass, transport it properly, and prepare it for skinning and processing before bacteria have an opportunity to multiply. The work does not end when the internal organs are removed. Proper handling during the next several hours has a significant impact on venison quality.
Move the deer to a cool, shaded location as soon as possible. If temperatures are below 40°F (4°C), natural airflow may provide sufficient cooling for a short period. During warmer weather, however, the carcass should be transported to refrigeration without unnecessary delay. Heat trapped inside the hindquarters and shoulders dissipates slowly, making rapid cooling essential for preventing spoilage.
Hang the deer whenever practical. Suspending the carcass by the hind legs improves air circulation, allows residual blood to drain, and provides easier access for skinning. If hanging is not possible, position the deer so the body cavity remains open and elevated from the ground. Avoid laying the exposed cavity directly on soil, leaves, or wet vegetation, which can introduce bacteria and debris.
Skinning should normally begin once the carcass reaches a suitable processing location. Removing the hide while the body is still warm is generally easier because connective tissues separate more readily. If outside temperatures are high, delaying skinning may trap heat inside the carcass and reduce meat quality.
Quartering becomes useful when transporting a whole deer is impractical. Hunters in backcountry areas often divide the carcass into the front shoulders, hindquarters, backstraps, neck, and trim meat before packing everything into breathable game bags. Keeping each cut clean, dry, and well ventilated reduces contamination while making transportation more manageable.
Some hunters choose to age venison before butchering to improve tenderness. Aging should only occur under controlled refrigeration, ideally between 34°F and 38°F (1°C–3°C). Under these conditions, many hunters age venison for 5 to 10 days, while older bucks with larger muscle mass may benefit from slightly longer aging if the carcass remains clean and properly chilled. Aging should never be attempted when temperatures fluctuate above safe refrigeration levels.
If refrigeration is unavailable, pack the cavity with sealed bags of ice instead of loose ice. Sealed ice lowers the internal temperature while preventing meltwater from soaking the meat. Replace melted ice regularly until permanent refrigeration becomes available.
What Are the Most Common Field Dressing Mistakes?
Most field dressing problems result from rushing the process rather than lacking experience. Avoiding a handful of common mistakes greatly improves meat quality and reduces unnecessary waste.
1. Waiting too long to field dress the deer
Leaving a harvested deer unprocessed for several hours allows body heat to remain trapped inside the carcass. Warm muscles create an ideal environment for bacterial growth, particularly during early-season hunts when daytime temperatures are high. Field dressing should begin as soon as the animal is recovered and confirmed dead.
2. Using a dull knife
A dull blade requires more pressure, increasing the likelihood of slipping and accidentally puncturing internal organs. A sharp knife produces cleaner cuts, improves control, and reduces fatigue throughout the dressing process.
3. Puncturing the stomach, intestines, or bladder
This is the mistake beginners fear most because digestive contents can contaminate surrounding meat. Making shallow cuts, lifting the abdominal wall before cutting, and advancing the blade slowly significantly reduce this risk. If contamination occurs, trim away affected tissue immediately and clean the surrounding area before continuing.
4. Allowing dirt, leaves, or hair to enter the body cavity
Hair and debris commonly enter the carcass when the incision is made carelessly or when the deer is dragged across rough ground after dressing. Keep the cavity facing upward whenever possible and remove visible contamination with clean paper towels before transport.
5. Failing to cool the carcass quickly
Even perfectly field-dressed venison can spoil if cooling is delayed. Opening the body cavity alone is not enough during warm weather. The carcass should be moved into shade, hung for ventilation, or transported to refrigeration as quickly as conditions allow.
6. Ignoring signs of disease
Some hunters focus only on removing the organs and overlook obvious abnormalities. Swollen lymph nodes, unusual discoloration, foul odors, abscesses, or severely abnormal organs deserve further evaluation. Following local wildlife agency guidance is particularly important in areas where Chronic Wasting Disease (CWD) surveillance is active.
7. Using poor hygiene during processing
Handling food, smoking, or touching equipment with blood-covered gloves increases the risk of spreading bacteria. Clean knives regularly, replace damaged gloves when necessary, and wash your hands thoroughly after completing the dressing process. Good hygiene protects both the hunter and anyone who later consumes the venison.
Learning to recognize and avoid these mistakes makes every future field dressing faster, cleaner, and more efficient. Even experienced hunters continue refining their technique because careful handling consistently produces higher-quality venison and reduces unnecessary meat loss.
How long can a deer stay before field dressing?
A deer should be field dressed as soon as possible after the harvest to preserve meat quality and reduce bacterial growth. There is no universal time limit because ambient temperature has a greater impact than the clock. The warmer the weather, the faster bacteria multiply inside the carcass.
When air temperatures remain below 40°F (4°C), hunters generally have more flexibility, although prompt field dressing is still recommended. During cool conditions, the carcass loses heat more efficiently, slowing spoilage and helping preserve venison quality.
When temperatures range between 40°F and 60°F (4–16°C), body heat can remain trapped inside the muscles for several hours. In these conditions, field dressing should begin immediately after the deer is recovered, followed by rapid cooling or transportation to refrigeration.
When temperatures exceed 60°F (16°C), delaying field dressing significantly increases the risk of spoilage. Heat, moisture, and bacteria create ideal conditions for meat deterioration, especially if the deer remains exposed to direct sunlight. During early-season hunts, minimizing the time between harvest, field dressing, and refrigeration is critical.
Weather is not the only factor affecting meat quality. Long tracking distances, delayed recovery, and poor ventilation around the carcass can also slow cooling. Regardless of the season, removing the internal organs and allowing heat to escape remains the fastest way to preserve venison.
Can you field dress a deer without hanging it?
Yes. Most hunters field dress a deer on the ground because it is faster, requires less equipment, and reflects real hunting conditions. Hanging the deer is helpful but not necessary for successful field dressing.
When working on the ground, position the deer on its back with the hind legs spread apart. If the terrain is uneven, use rocks, logs, or a length of paracord to stabilize the carcass before making the first incision. A stable position improves knife control and reduces the chance of accidentally puncturing the stomach or intestines.
One advantage of ground dressing is that it can be completed immediately after recovery without searching for a suitable tree or hoist. This allows hunters to begin cooling the carcass sooner, which is often more important than working from a perfectly elevated position.
The primary challenge is keeping the exposed body cavity clean. Avoid dragging the deer after opening the abdomen, and prevent dirt, leaves, snow, or standing water from entering the cavity. If necessary, roll the carcass slightly onto one side to improve drainage while keeping the opening away from the ground.
Hanging becomes more beneficial after field dressing, especially for skinning, aging, and butchering. Elevating the carcass improves airflow, makes skin removal easier, and provides better access to all sides of the deer during processing.
Frequently Asked Questions
Should you wash the body cavity with water?
Only use clean potable water when absolutely necessary. If the body cavity remains clean after field dressing, wiping away blood and loose debris with clean paper towels is usually sufficient. Excess moisture left inside the carcass can encourage bacterial growth, especially if the meat is not cooled immediately. Never rinse the cavity with water from streams, ponds, or lakes because untreated water may introduce harmful bacteria.
Should you keep the heart and liver?
Yes, provided the organs appear healthy. The heart and liver are popular cuts among many hunters and can be excellent table fare when they show no signs of disease. Before keeping them, inspect both organs for abnormal discoloration, foul odors, abscesses, large parasites, or unusual growths. Discard any organ that appears unhealthy or suspicious.
Do you need to split the pelvis?
No. Splitting the pelvis is optional for most hunters. Some hunters split the pelvic bone to improve access when removing the lower intestine, while others avoid doing so to reduce bone fragments and simplify cleanup. Both methods are effective when performed correctly. Choose the technique that matches your experience, tools, and local hunting practices.
Can you field dress a deer at night?
Yes, but adequate lighting is essential. A high-quality headlamp provides better visibility while keeping both hands free for safe knife control. Work more slowly than you would during daylight, paying close attention around the stomach, intestines, and bladder. If lighting is poor, taking extra time is safer than rushing and contaminating the venison.
Can one person field dress a deer alone?
Yes. One experienced hunter can field dress a deer without assistance. Most adult deer can be field dressed by a single person using a sharp knife and a pair of disposable gloves. Stabilizing the carcass with rope or natural supports makes the process easier, particularly on uneven terrain. Larger-bodied deer may require additional effort during transport, but field dressing itself is routinely performed by solo hunters.
Final Thoughts
Field dressing is the foundation of high-quality venison. Removing the internal organs promptly, preventing contamination, and cooling the carcass without delay have a greater impact on meat quality than any later processing step. A careful, methodical approach produces cleaner cuts, reduces waste, and prepares the deer for skinning, aging, and butchering.
As you gain experience, your speed will naturally improve. However, accuracy should always take priority over speed. Every clean incision, every sanitation practice, and every decision to cool the carcass quickly contributes to safer, better-tasting venison and a more successful harvest.